

One of the biggest challenges in data science is deploying a machine learning (ml) application to production. This phase is often complicated by the fact that the code base is sensitive to the operating system it’s running on, and that there can be a number of other complex dependencies needed for a machine learning application to run. Enter docker.
Docker in a Nutshell
Docker is used to package other software into standardized units, called containers, for development, shipment and deployment. These containers differ from the more familiar virtual machine (VM) in that containers are an abstraction at the application layer and thus share the same host operating system (OS).

As a result, containers are much more lightweight and portable while maintaining interoperability across platforms. The blueprint for a container is called a docker image. When a docker image runs, a container is created. Many files constitute a docker image, but chief among them is the Dockerfile. From the documentation:
A Dockerfile is a text document that contains all the commands a user could call on the command line to assemble an image.
To summarize:
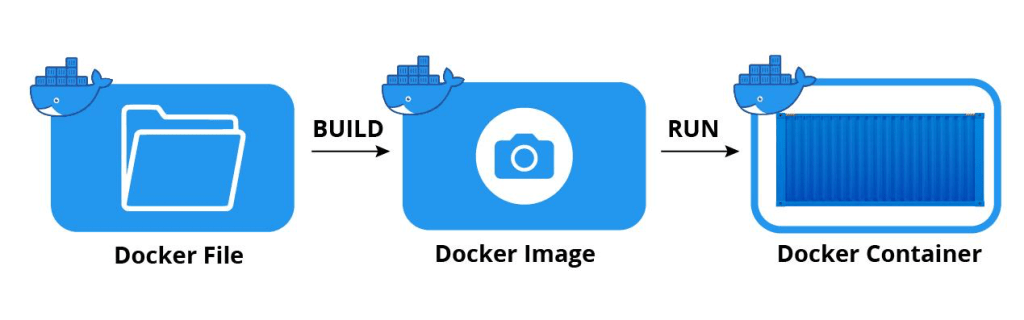
Creating a containerized ml application alleviates one of the main headaches in the deployment process.
Containerizing a Streamlit Application
To explore how to use docker, we’ll first need a use-case. In a previous project, I created a ML-powered Streamlit application that, upon user input, provides the usage summary, churn likelihood, and drivers of churn for a single customer:
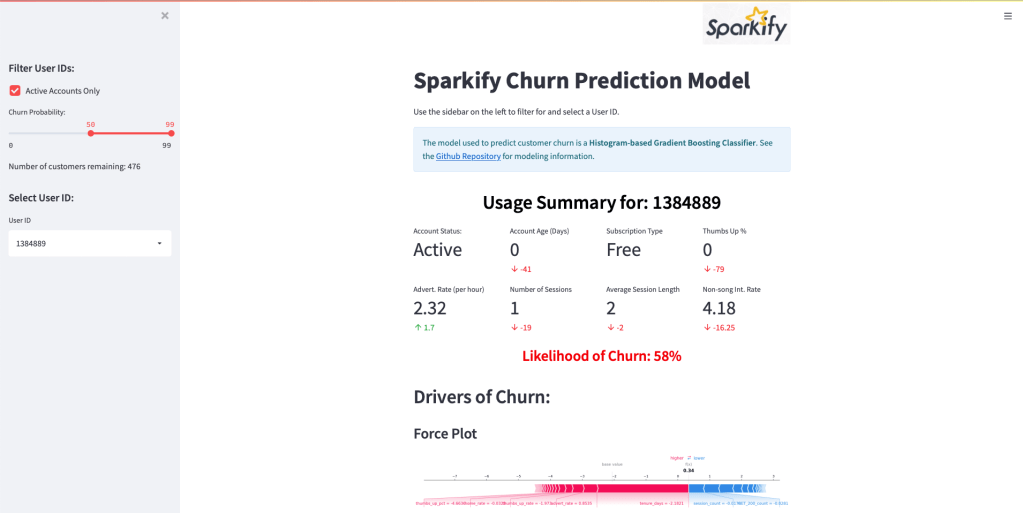
I’ve wanted to explore deploying this dashboard for a while and thought this would be an excellent opportunity to learn docker.
The technical details of the project don’t concern us here, we’re only interested in containerizing and deploying the Streamlit dashboard. However, if you’re interested in Spark, Streamlit, SHAP, or Azure Databricks, there is a detailed README containing the project summary, analysis, and results. The Github is available here.
Steps:
- Install docker.
- Clone the Github repository locally and cd into the root of the project folder:
git clone https://github.com/smit5490/sparkify-customer-retention.git3. Review the Dockerfile in the repository:
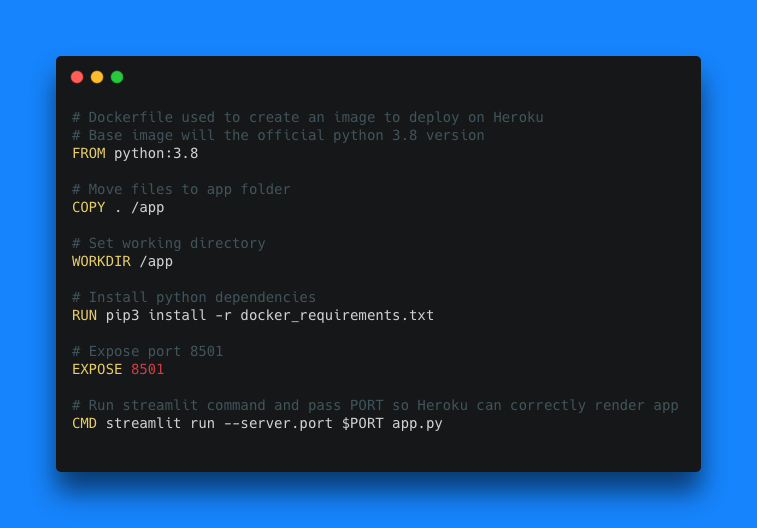
Luckily, it’s relatively straightforward to deploy a Streamlit dashboard using docker. Let’s walk through each line in the Dockerfile:
FROM python:3.8The FROM instruction initializes a new build stage and sets the Base Image for subsequent instructions. A valid Dockerfile must start with a FROM instruction. In our case, we are using the official Python v3.8 image as our base image from docker hub.
COPY . /appThe COPY instruction copies new files or directories from <src> and adds them to the filesystem of the container at the path <dest>. In our case, we’re copying the local git repository contents to the app folder in the container.
WORKDIR /appThe WORKDIR instruction sets the working directory for any RUN, CMD, ENTRYPOINT, COPY and ADD instructions that follow it in the Dockerfile. In our case, we’re setting our working directory to be our app folder we just created and populated.
RUN pip3 install -r docker_requirements.txtThe RUN instruction will execute any commands in a new layer on top of the current image and commit the results. The resulting committed image will be used for the next step in the Dockerfile. Here, we’re installing the Streamlit dashboard’s Python package dependencies.
EXPOSE 8501The EXPOSE instruction informs Docker that the container listens on the specified network ports at runtime. When running our container locally, we’ll use port 8501. When deploying this application, Heroku uses its own port which can change from run to run. A PORT environmental variable is available at run time to route applications appropriately.
CMD streamlit run --server.port $PORT app.pyThe main purpose of a CMD is to provide defaults for an executing container. There are many ways to run CMD. In our case, we’re using the shell form. You can read more about this command here. Here, we’re telling the container to run the app.py Streamlit application on a specified PORT (per the environmental variable).
There are other docker-related files in the repository including a .dockerignore which, like a .gitignore file, ignores the specified files and folders from being copied over into the image. Excluding any unnecessary files will reduce the image size and increase portability.
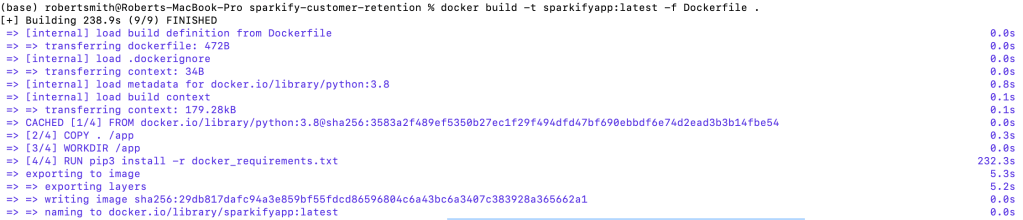
4. Build an image. On the command line (in the project’s root directory), type:
docker build -t sparkifyapp:latest -f Dockerfile .This command tells docker to build an image with a name:tag (-t) of sparkifyapp:latest using the file (-f) Dockerfile in the working directory (.) It might take a few minutes for the image to be created:
5. Run the image: docker run -p 8501:8501 -e PORT=8501 sparkifyapp:latest
This command tells docker to run the sparkifyapp:latest image, expose port (-p) 8501, and create an environmental variable (-e), PORT, and set it to 8501.
6. Open the Streamlit application by navigating to http://localhost:8501 on any web browser.
To get a list of running containers type docker ps. To stop a container type docker stop NAME. The NAME can be found in the container list.
It’s great that we were able to build and run a containerized application locally, but we should also deploy this container somewhere else. An easy place to test things out is Heroku.
Deploying to Heroku
Heroku lets you deploy, run and manage applications written in Ruby, Node.js, Java, Python, Clojure, Scala, Go and PHP.
7. Sign-up for Heroku. There is a free account option which allows users to spin up small applications and is sufficient for many simple proof-of-concepts and experimentation.
8. Download the Heroku CLI. I used this on a Mac, so I installed via homebrew:
brew tap heroku/brew && brew install herokuLogin to Heroku:
heroku login9. Create a Heroku Application
heroku create <app_name>The application name must be globally unique (to Heroku) and should be the same name as your image. It will also be used as part of the url to the streamlit dashboard:
https://<app_name>.herokuapp.com
10. Login to the Container Registry:
heroku container:loginIn order to deploy a containerized application on Heroku, we must register our container with Heroku’s Container Registry.
11. Push docker image to Heroku’s Container Registry. First tag the docker image and push it to the registry with this naming template:
docker tag sparkifyapp:latest registry.heroku.com/<app_name>/web
docker push registry.heroku.com/<app_name>/web
There’s one major quirk at this step that I had as a result of using a Mac with Apple silicon; the docker image didn’t compile correctly without specifying what platform to use when building the image. Stack Overflow came to the rescue and provided some guidance on how to re-build the image before tagging and pushing to the registry:
docker build --platform=linux/amd64 -t sparkifyapp:latest -f Dockerfile .After re-building the docker image with the platform specified, I was able to push it to the registry. Depending on your internet connection, this might take a while. It’s about a 2GB image that gets pushed to the registry.
12. Release container to the web.
heroku container:release web13. Access the deployed dashboard. Navigate to the web url or type heroku open. My application can be viewed at: https://sparkifyapp.herokuapp.com Sometimes it might take a minute for the application to render; Heroku’s compute instances need a little time to spin up the container.
And that’s it! In 13(-ish) steps, it’s possible to deploy a containerized data science application on Heroku.
